GPX FR4004SP radio hack

A few months ago, before going in my vacation, I was looking for a way to power my cellphone where no electricity was available. I already had a solar charger, but I wanted to have some backup in case there is a cloudy day.
One day I was shopping at Sears and seen this radio that was on sale, that had a crank (hand dynamo). I got it for 10 bucks, but if you don't find it at Sears, try Amazon.
Initially my plan was to cannibalize it and take it's dynamo, but first I decided to listen to it, and see how good it works as a radio. I live in a valley between some hills, and the radio reception is not the best. And since there are two computers in the room, that doesn't help much either. None of my radios (I have about 5 of them, including a 120 dollar Sony ICF-SW7600GR) was able to get a clear, no noise AM reception, with or without an external antenna.
Well, to my surprise, this radio got the most clear AM reception! No background noise at all!
My initial thought was to keep it as it is, rather than cannibalize it for parts.
The problem was that it's internal battery as kind of crappy, it wouldn't charge properly, and it's solar panel was a joke (5.5V @ 25 mA, estimated).
The hand crank broke within a few days (maybe 30 minutes of cranking at most), and as you can see from the Amazon reviews page, it happened to others as well.
So, given the fact that it was cheap and good at the same time, I decided to do something about it. My original plan was to add an USB charger cable so I can charge it from my computer or from my solar USB charger. This also required changing the 3 NiCd batteries with a LiIo battery (you can't properly charge 3 NiCd batteries in series from 5 volts, especially if you have a diode as well).
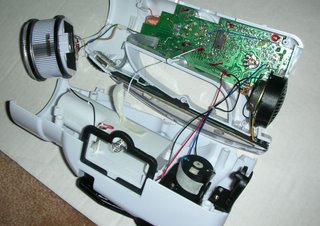
So I opened the radio, which looks like this:

I couldn't find the batteries, so I assumed they are behind the circuit board. I unscrewed all the screws, but still couldn't get the circuit board out. Perhaps the dials on the other side were glued on the potentiometers?
Seeing I can't follow my original plan, I adjusted some details: instead of USB charging, I went for it's own power source: a 6v @ 100 mA solar panel.
The problem with that was that it wouldn't fit where the previous solar panel was, and even if it did, the radio was a bit too wide to fit in my window. However, while it was opened, it did fit well.
The final decision was to just take the dynamo, it's old solar panel, the flashlight head and battery compartment to use for other unrelated projects, and have the new solar panel and battery installed in the radio, to be used exclusively as a stand alone radio.
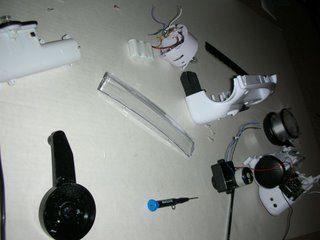
Here are the 'modules', separated from the radio.


At this point, after cutting the wires, I discovered that the radio's internal battery were actually hidden in the flashlight head..
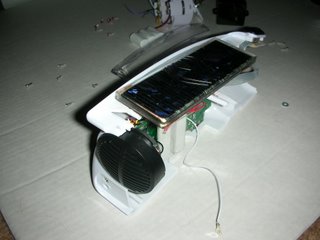
Next I installed the 800 mA LiIo battery, which I connected to where the external battery input.

And then the solar panel with the diode, which I just glued to the top of the radio, where the previous one was.


The white hanging wire is for the FM antenna. I didn't reuse it's original antenna. Instead, I have a 2 meters long wire, taped on the ceiling, which I connect with an alligator clip to the white wire. With that, the FM reception is perfect as well, much better than the one I have in my expensive Sony radio.
Some might think that the radio is ugly with half of the case missing, but the missing half is facing out of the window, so you won't even notice it's missing.
If you attempt this hack, you can put the other half back and connect the solar panel on top of where the old one was.
Overall, the radio is much more functional now, and it can run for more than a day on that tinny battery (on a cloudy day).

1 Comments:
Hi man,
I have read it all.
Very good idea.. I can see you also understand eletrical stuff.
I have read all your 5 articles about Eternal Lands.
It was very well written ... seamed like a chat.
Nice to see your ideas again.
Regards,
Renato
renatozimerfeld@hotmail.com
Post a Comment
<< Home